US Stamps
Is expertizing required? 10 situations when the answer is no
By John M. Hotchner
In this monthly column on expertizing, I am presenting 10 situations from the first 100 years of United States issues that can be used to identify a stamp as likely not worth the cost of expertization.
All that is required is that you know what to look for and that you have the following elementary collecting tools: a perforation gauge, a good magnifier (preferably one rated at 20x or higher), and a watermark tray and fluid.
Situation 1
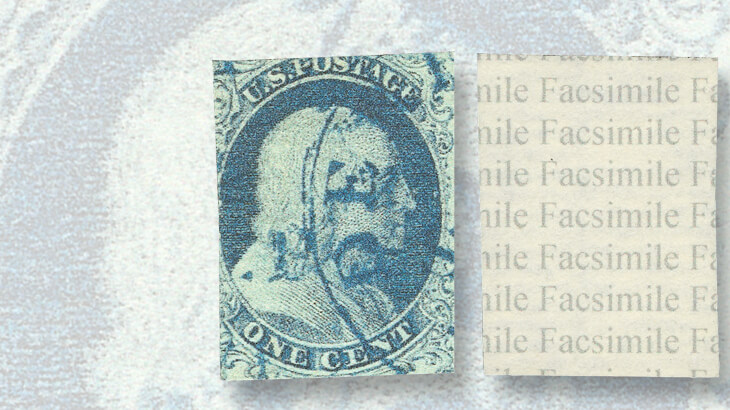
The first example looks like it is an imperforate 1851 1¢ Benjamin Franklin, probably one of the more expensive imperfs. But, in this instance, it is hard to tell which of the six listed types it is because the stamp is cut so close that most of the identifying features are missing. That alone makes it problematic, but when the stamp is turned over, the word “facsimile” is printed across the back.
Connect with Linn’s Stamp News:
Sign up for our newsletter
Like us on Facebook
Follow us on Twitter
Always turn over a stamp you are considering buying. Previous owners may have penciled the word “fake”, “repaired,” or some other note.
You may also be surprised at other features you may find. I have a lovely, lightly canceled pair of 1851 12¢ imperfs, (Scott 17) that when turned over reveals that is has been cut from a magazine ad.
Situation 2
Thins, tears, added perforations, pin holes, repaired gum, and other damage also are visible from the back of a stamp. The stamp may be genuine, but worth only five percent to 10 percent of its catalog value because of the damage.
Sometimes the damage is visible to the naked eye, but more often repairing of high-catalog-value stamps can be seen if you dip the stamp face down in watermark fluid. Flaws show up as darkened areas. Of course, an expertizer will do this, but you can do it for yourself.
Situation 3
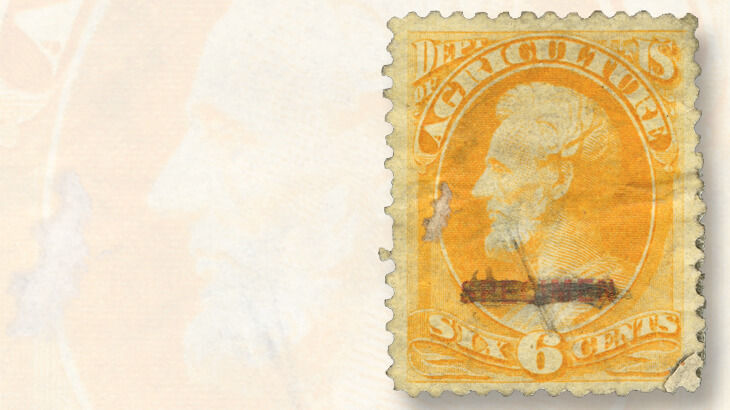
The third situation involves stamps that bear a notation on the front that disqualifies them as genuine regular issues. The 6¢ Agriculture Official shown nearby is a good example. When I found it offered as Scott O4, I was surprised. Someone had crudely scratched out the word “specimen.” What is startling is that the genuine specimen actually catalogs far more than Scott O4.
Situation 4
You would expect that the reverse doctoring — adding the word “specimen” — would be prevalent. Usually such fakery is poorly done and easily identified. What you need is the Scott catalog illustration, or a handy auction catalog in color, to be able to compare your candidate with a genuine example.
Situation 5
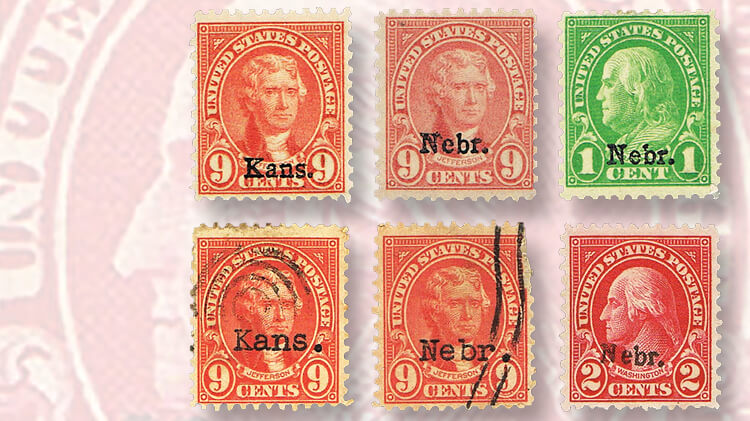
The fifth situation is the addition of “Kans.” or “Nebr.” to 1922 Fourth Bureau Issue stamps with denominations of 1¢ to 10¢. There are other comparison points, but the first quick check is to look at the overprint. Added overprints often were typed onto the stamp in characters that do not match the original. Also, such typing leaves an impression on the back on the stamp. That impression should not be there because the genuine overprints were put there with a surface-printed rubber mat that left no impression in the stamp paper.
Only if the overprint itself looks genuine, do you need go to the second comparison point, which is close-together vertical gum breakers. They will be present on all genuine Kansas-Nebraskas, because that is the only variety to which the overprints were added.
Situation 6
The thickness of the stamp can be a deciding factor in determining if it needs to be expertized. If it feels too thick, beware of the sin of pasting a poor example on top of another stamp to make it look acceptable. This also will be obvious if the stamp is dipped, but you can skip that if you just look carefully.
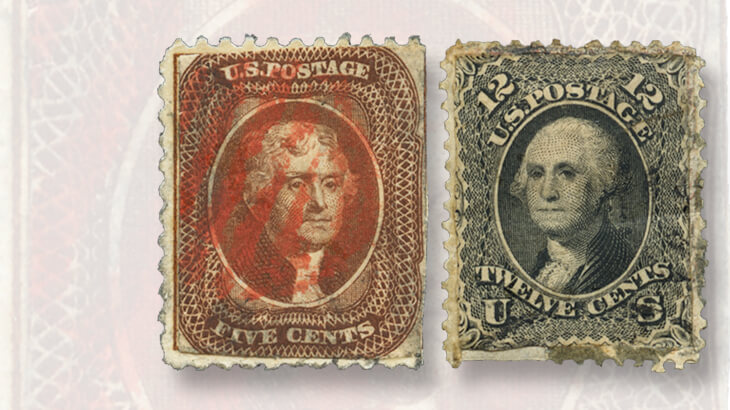
Two examples are shown nearby. The 1857 5¢ design (Scott 30A) is obvious because the margins are too white and the perforations are the wrong size. Checking perforations is a seventh category of inquiry.
This 5¢ stamp is actually pasted on top of a 1½¢ denomination of the 1922 Fourth Bureau issue, which is perforated gauge 11 by 10½, rather than the perf. 15½ of the normal.
The 1861 12¢ stamp is much more artfully done. It is a cut square, pasted on top of another stamp from the same issue, so the perforations are correct. It has faults, but would still be much more expensive than the damaged 12¢ unimproved by the new backing. Keep in mind that only part of a stamp may be added, such as a new top or a “replacement”corner.
Situation 7
A related problem is do-it-yourself inverts, where the center design has been carefully cut out of a normal example of a stamp and replaced so it resembles an invert. Some excellently crafted do-it-yourself inverts can even be found on contemporary covers. While it may take a practiced naked eye to spot such deceptive handiwork, if you run your thumb over the stamp, you will feel the ridge where the cuts have been made.
Viewing under a good magnifier also can reveal this problem. And of course dipping the stamp will be a dead giveaway.
Situation 8
The eighth category is added perforations and reperforating in general.
In the first instance, you can often tell if imperfs or straight edges have been perforated because the row of new perfs is not exactly parallel to the perfs on the opposite side of the stamp, because the perforations do not measure exactly the same as perfs on the other side of the stamp (or the perfs on an inexpensive reference example), or because there are perforations on line singles or arrow singles that should not have perforations.
Reperforating to eliminate damaged perforations has evolved over the years, but earlier attempts, as well as some later ones, will not match the proper perforations exactly. Compare to a low-denomination genuine example to eliminate candidates. Put the candidate on top of a genuine example, and the perforations must match exactly.
In addition, look at the holes. Original holes will have slightly rough edges, and anything printed on a rotary press will have holes that are slightly elongated. Also, a visual check is useful to make certain that the holes are equidistant from one another and consistent in size with the holes on the other edges of the stamp. If the perforations are too smooth, too clean, or too large or small, it is not a good candidate for your stamp album.
Situation 9
The ninth category is the removal of perforations to create imperfs or coils. In most cases, early 20th-century imperfs and coils are more valuable than the same design in the form of sheet stamps. Combine this with the fact that the exact placement of perforations on sheet stamps was an inexact science.
It is no surprise that coils and imperfs are often seen that upon examination are found not genuine.
The standard is to collect imperfs in pairs, and that eliminates most monkey business. The same is true for coils under review if there are pairs or longer strips.
However, when singles are presented, there are two tests that you can use to determine if the stamp is likely to be genuine.
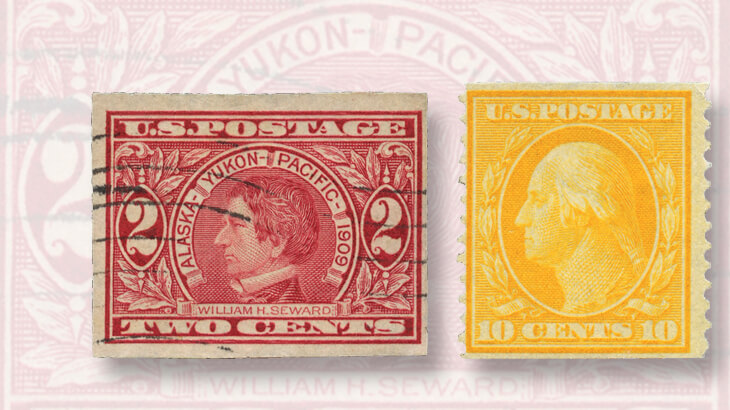
First, is the stamp large enough? In cutting off even wide-set perforations to make imperfs and coils, the result is too small to qualify, as shown on the 2¢ William H. Seward stamp of the Alaska-Yukon Exposition issue, even though this example has some margin. Secondly, for coils, the cuts are rarely exactly straight, and exactly parallel, as would be the case for an officially produced coil.
Situation 10
The final category is cleaning and regumming. They often go together, especially when a pen cancel is light enough to be removed. But regumming also can be done when the gum on a mint stamp has been improved after being disturbed by a hinge (or multiple hinges), or when mint stamps have stuck together and been washed to separate them.
If cleaned, the face of the stamp will often be unnaturally white. It may also show up as disturbed under ultraviolet light, especially when compared to an inexpensive example from the same set.
Having a genuine gummed example to use for comparison is a great strategy to counter regumming. Whether the gum has been sprayed on or painted on, it is difficult for the regummer to achieve the exact color, consistency and pattern of genuine gum, though not impossible. Today, the art of regumming has gotten quite professional using gum from genuine low-value stamps to improve higher value stamps.
There is a second test to check that can be used if the area of regumming includes the stamps’ perforations.
Keep in mind that perforations were added after gumming on genuine stamps, and remember that gum has to be liquefied to be added in regumming. The result is that in all but the most professional jobs, the perforation hole edges and tips will not be crisp and clean as normal. Under magnification, you can find evidence of discoloration from the application of the liquid gum after the holes were punched, or you can find gum only around the edge of the hole. Regummers also sometimes try to stop application of gum just short of the hole, and that can be obvious.
The tests described for these 10 situations will often result in conclusive results, ruling out the candidate as fully genuine. However, in those cases where the you are not certain or have suspicions, getting the stamp expertized is the way to go.
After all is said and done, you can determine that a stamp is not worth submitting, but only a good expertizing certificate proves that it was worth submitting!
MORE RELATED ARTICLES
Headlines
-
US Stamps
Oct 7, 2024, 3 PMMcMurtrie dismissed as APS education director following Sept. 21 arrest
-
US Stamps
Oct 7, 2024, 12 PMVasiliauskas named president of Mystic Stamp Co.
-
US Stamps
Oct 6, 2024, 5 PMApgar souvenir card available
-
US Stamps
Oct 6, 2024, 4 PMFirst Continental Congress and U.N. stamps receive Scott catalog numbers
